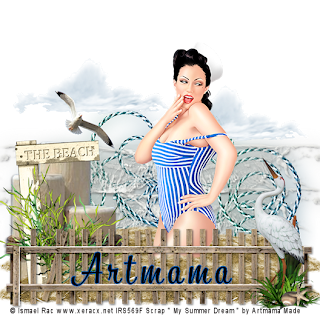
Day At The Beach
This tutorial was written
by Sarah Fiack on
April 3, 2011
Any resemblance to another
tutorial is purely coincidental.
For this tutorial, I’m using
a tube by Ismael Rac. You can purchase
it at his store
Supplies:
Tube of choice
Scrap of choice.
I’m using one by Artmama made
Called My Summer Dream
Here
Open a 600x600 new image.
Open up your tube & scrap supplies.
Open a wooden fence element &
resize 88%.
Paste as a new layer & arrange near
the bottom of the tag.
Add a drop shadow to the fence layer.
2,2,50,5 Black
Open a sand dune element.
Paste behind the fence on
one side. Duplicate it once & mirror.
Now merge the two sand dunes layers
together. Duplicate once.
Move the original dunes layer up slightly
from behind the copy layer.
Paste your tube as a new layer between
the two dunes layers.
Resize only this layer 85%
Add a drop shadow to the tube.
Open a cloud element.
Paste twice behind your main tube
on the tag.
Open a bush with a bird element.
Paste at an end of the fence of choice.
Open another bush element & mirror if needed.
Paste on a sand dune behind or under the fence layer.
Open a beach sign.
Resize 50%.
Position on the tag behind the 2nd bush.
You want it to appear to be standing behind
the bush.
Choose a flying bird element.
paste as a new layer above the beach sign layer.
Open wooden logs ropped together.
Mirror them once.
Paste behind the beach sign.
Open a horizontal rope doodle.
Paste on the bottom layer &
Move to appear slightly above & behind
the sand dunes.
Duplicate once & mirror.
Open a white mist element.
Paste twice - one on each side of the rope.
Add a drop shadow to the two mist layers.
Merge the 2 rope layers with the
two mist layers. Duplicate once.
Move the copy layer up slightly on the tag
from the original merged layers.
Now merge the two layers together one last time.
Duplicate once again.
On the bottom of the two layers,
Adjust blur gauassian 15
Merge layers visible.
Resize 88%
Add copyright info & name.
Save as png.
Thanks for trying my tutorial.

No comments:
Post a Comment