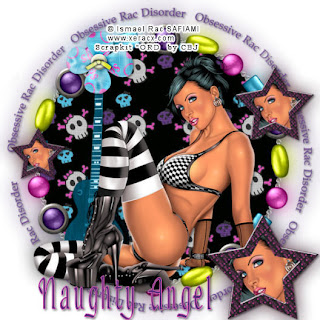
O.R.D.
This tutorial was written
by Sarah Fiack on
Nov. 17, 2009.
Any resemblance to another
tutorial is purely coincidental.
For this tutorial, I’m using
The art of Ismael Rac
You need a license to use
The art can be purchased at
Xeracx
I purchased the tube when Ismael Rac was
licensed with AMI.
Supplies:
Tube of choice
Scrapkit of choice.
I’m using one by
Creations by Jo
Called Obessive Rac Disorder
View her blog & stores here
Font Panache
1) Open a white 600x600 new image.
Open a frame from the scrapkit of choice.
Resize as needed. For the frame I chose
I resized 80%.
Paste as new layer onto the white image.
2) Select in the center of the frame with magic wand.
Go to selections modify expand by 2
Select a paper of choice & paste as new layer.
Go to selections invert & press delete.
Select none & move paper layer under the frame layer.
3) Paste your tube as new layer & position as desired.
Add a drop shadow to it either of choice
Or use the settings 2,2,50,5 black.
4) Open wordart circle. I resized it by 50% and
Then by 90%.
Paste as new layer & move the layer to above the
Background layer in layer palette.
Add a drop shadow to it.
5) Open a guitar of choice.
Resize by 85%.
Use your raster deform tool to alter the direction of the guitar.
Paste as new layer & move the layer so its partly
Behind your main tube.
Add a drop shadow to it.
6) Open a flower tube & paste as new layer.
Position on top of the guitar arm.
Add a drop shadow.
7) Open a star frame & resize by 50% & 80%.
Click inside the frame with magic wand
& selections modify expand 2.
Add new raster layer.
Fill with color from tube.
8) Paste tube or close up image as new layer.
Selections invert
Press delete.
Select none.
Move color layer tube image below the star frames.
Copy merged onto tag image.
Position as wanted.
Duplicate once & resize 70%.
Position as wanted.
Repeat this step one more time.
You should have 3 star frames around the tag.
Drop shadow them.
9) X out the background layer.
Merge visible all layers.
Un X the background layer
Duplicate the merged layers.
On the bottom merged layer go to adjust
Blur Gauassian Blur 15
10) Resize all layers by 88%.
Add the copyright info & name.
Save as png.
Thanks for trying my tutorial.

No comments:
Post a Comment