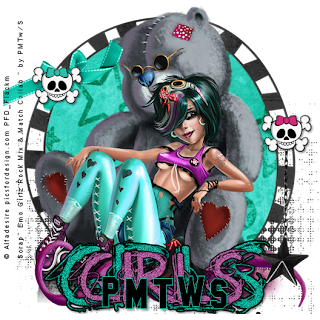
Emo Girls
This tutorial was written
by Sarah Fiack on
April 19, 2011
Any resemblance to another
tutorial is purely coincidental.
For this tutorial, I’m using
a tube by Alfadesire
You can purchase the tube at
PicsForDesign
Supplies:
Tube of choice
Scrap of choice.
I’m using an Emo Girlz Rock Mix & Match Collab
It is available at Pimp My Tags
with Scraps
Here
Open a 600x600 new image.
Open up your tube & scrap supplies.
Note:
If you are using the same tube which I used,
please resize 40% so that it is a managable
size.
You also want to adjust the resolution to
72dpi. Please make sure you change the width
& height to 100 before you click okay.
Now to begin the tutorial
Copy your tube merged & paste as a new layer.
Open a circle frame of choice & resize 88%
Add a drop shadow 2,2,50,5 black
Click inside the frame with your magic wand.
Selections modify 2
Paste a paper of choice as a new layer.
Selections invert & press delete.
Move the paper under the frame layer.
Select none.
Copy merged paper & frame.
Paste as a new layer on the bottom layer.
Open a background wall element.
Resize 75%
Paste on the bottom layer on the
bottom half of the tag.
Open a doodle type ribbon.
Resize 85%
Position on the tag at the bottom.
Open a wordart in two different colors.
You want it to be the same words though.
Paste one as a new layer on the tag.
Position near the bottom on the top layer
of the tag. You want it on top of the ribbon.
Open the 2nd color of the word & resize 80%
Now paste this one on top of the 1st word.
Add a drop shadow to each word art saying.
I used 2,2,50,5 black.
Open skull face buttons.
Resize 50%
Paste on on each side of the frame.
Add a drop shadow.
Open a hanging element.
Resize 50%
Paste under the skull layer.
Arrange on the tag so that it appears to be
hanging from under one of the skulls.
Choose a bow of choice.
Resize 40%
Paste under the skull without the
hanging element.
Merge layers visible.
Resize 88%
Add copyright info & name.
Save as png.
Thanks for trying my tutorial.

No comments:
Post a Comment