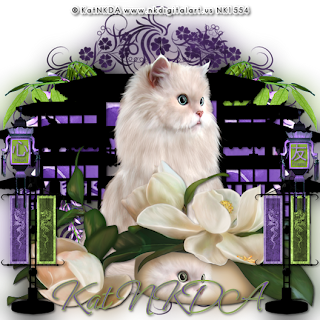
Miyoki San
This tutorial was written
by Sarah Fiack on
May 10, 2010.
Any resemblance to another
tutorial is purely coincidental.
For this tutorial, I’m using
The art of Kat NKDA
You need a license to use
The art can be purchased at
Her site here
Supplies
Tube & closeup of choice
Scrap of choice
I’m using one by KatNKDA called
Forbidden City
It is a PTU kit.
Floral mask of choice
1) Open a 600x600 new image.
Open tubes of choice.
Select floral tube.
Paste as new layer near bottom of tag.
Add a drop shadow
2,2,50,5 Black
2) Paste cat tube of choice.
Position so it appears to be sitting
Behind the floral tube.
Add a drop shadow.
Resize the cat tube 88%
3) Duplicate the floral tube once.
Move the bottom floral tube
Behind the cat tube.
4) Open a pagoda building tube.
Resize 50% once & 48% once.
Paste as new layer as bottom layer.
Add a drop shadow
5) Select inside areas of pagoda building
With magic wand.
Selections modify expand 2
Paste paper as new layer
Selections invert & press delete.
Select none.
Move under building layer.
6) Merge the building & paper layer together.
Duplicate twice.
Resize the two copy layers 50%.
Move down in front of the bigger building.
7) Merge the two smaller buildings together.
Duplicate once.
Move the bottom small buildings below the big building
& up slightly.
8) Open flag tube.
Resize 50% twice.
Paste as new layer .
Duplicate once & mirror.
9) Choose a hanging latern.
Fill with color of choice from scrap.
Resize 50%.
Paste twice on the tag.
Add drop shadows.
10) I took the asian symbols which came with the kit.
Using my selection tool, I selected one to use.
I resized 50% twice.
I then pasted as new layers into
The laterns.
Add drop shadow.
This is entirely optional
11) Choose a hanging branch flower.
Resize 50% & 70% once each.
Paste as new layer on side behind buildings.
Add a drop shadow.
Duplicate once & mirror.
12) Paste paper of choice above background layer.
Apply floral mask of choice.
Merge group.
13) Duplicate the mask & merged layers together.
Duplicate once
On bottom layer, adjust blur
Gauassian 20
14) Resize all layers 88%.
Add copyright info & name.
Save as jpeg or png.
Thanks for trying my tutorial

No comments:
Post a Comment