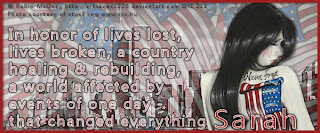
Never Forget
This tutorial was written
by Sarah Fiack on
September 5, 2011.
Any resemblance to another
tutorial is purely coincidental.
For this tutorial, I’m using
a tube by Robin McQuay.
This tube is available at Dreamscape Imaging
Here
Supplies:
Tube of choice
Photo of choice
I am using a photo of the twin towers.
I found this photo at stock.xchng
Here
Plugins:
Eye Candy 4000 Gradient Glow
Muras Meister Copies
I am writing this tutorial in remembrance
of September 11th. This year is the 10 year
anniversary of everything that happened
that day. My heart goes out to all the families
affected by a loss and suffering from the
events of that day.
Open your photo of choice.
Resize as needed. I am resizing the
one I am using by 43%
Open your new image 600x250.
Click on your new image with your
magic wand tool..
Copy & paste your photo as
a new layer. Selections invert
& press delete.
Select none.
Go to adjust
Hue & saturation.
Change both settings to zero.
We want the photo greyscale but not
the whole tag. This is a good way
to get that effect.
Open a flag element.
The flag I am using came as a seperate
layer with the tube I chose.
Now apply Mura's Meister
Copies -wallpaper rotate
default settings.
Lower the opacity of the flags
to about 30 or as wanted.
You can do this in your layer
palette. By lowering the opacity
you can see the towers with
the flags.
Open your tube of choice.
Resize if needed. I resized
the tube I used 70%.
Paste as a new layer.
Move to the side of the photo.
You want to make sure the twin
towers are visble.
Add a drop shadow to the tube
layer.
2,2,50,5 Black.
Add text of choice to the tag.
This can be entirely up to you
& how this has affected to you.
I did font size 18.
Stroke was white & fill was red.
After converting the text to
raster, I applied
EyeCandy 4000 Gradient Glow
Black halo glow width 3.
This is also optional.
Merge layers together.
Add a new raster layer.
Fill with a color of choice from
your tag. I filled mine with red.
Click on the new layer with your
magic wand tool. Selections modify
contract by 5.
Press delete.
Select none.
Add a drop shadow to the new border
that you just created.
2,2,50,5 Black
Merge layers visible once again.
Add copyright info & name.
Save as jpeg.
Thanks so much for trying my tutorial.
This one means so much to me.

No comments:
Post a Comment