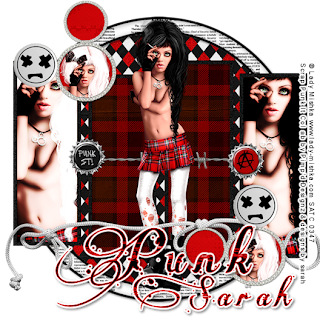
Punk
This tutorial was written
by Sarah Fiack on
July 27, 2011
Any resemblance to another
tutorial is purely coincidental.
For this tutorial, I’m using
a tube by Lady Mishka.
You can purchase this tube at
SATC
Supplies:
Tube of choice
Scrap of choice.
I’m using a scrap collab called
Punk It.
The collab is by Pimp'd Designz &
designs by sarah
It is available at Pimp My Tags
with Scraps
Here
Open a 600x600 new image.
Open up your tubes & scrap supplies.
Choose a frame of choice.
Resize 90%
Paste as a new layer.
While holding shift button down,
using your magic wand tool
click inside each part of the frame.
Selections modify expand by 5.
Paste a paper of choice as a new layer.
Selections invert & press delete.
Move the paper layer under the frame layer.
Paste two tube closeups in the frame.
I did one one the left & one on the right.
Position the closeup layers as wanted.
& press delete.
Select none.
Apply Xero Radiance plugin to the
closeup layers
Settings:
Strangeness 128
Charm 50
Truth 128
Beauty 255
Add a drop shadow to the frame layer.
2,2,50,5 Black.
Paste your main tube as a new layer.
Arrange in center of the frame.
Open a round frame.
Resize 85%
Click inside the frame with magic wand.
Selections modify expand by 3.
Paste a paper of choice.
Selections invert & press delete.
Move paper under frame.
Select none.
Add a drop shadow to the frame layer.
Copy merged & paste on the bottom layer
of the tag.
Open a barb wire element.
Resize 50% & 95% once each.
Paste behind your main tube along
the original frame.
Open two bottlecap elements.
Resize both 30%
Paste each one at an end
of the barb wire element.
Open a smaller multi circle
frame.
Click inside the circles with
your magic wand tool.
You may have to hold shift
button again.
Paste a 3rd paper of choice.
Selections invert & press delete.
Move the paper under the frame layer.
Paste your tube closeup again in
the frame.
Position as wanted & press delete.
Add a drop shadow to the frame
& closeup layers.
Resize 50%
Paste on the tag image twice.
Open a smiley face element.
Resize 70%
Paste once on each of the
small mulit circle frames.
You want one smiley per frame.
Open a rope ribbon element.
Resize 88%
Paste under the same frame.
Position along the bototm part of the tag.
Add wordart or text of choice to
the bottom front of the tag.
I added an optional Gradient Glow
Using Eyecandy4000.
Setting Fat glow width 3
Do make sure you add a drop shadow
to the text.
Merge layers viisble.
Resize 88%
Add copyright info & name.
Save as png.
Thanks for trying my tutorial.

No comments:
Post a Comment