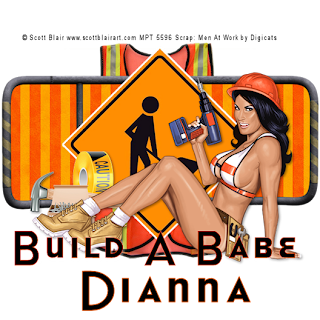
Build A Babe
This tutorial was written
by Sarah Fiack on
July 11, 2011
Any resemblance to another
tutorial is purely coincidental.
For this tutorial, I’m using
a tube by Scott Blair.
You can find it at
MyPSPTubes
Supplies:
Tube of choice
Scrap of choice.
I’m using one by Digicats ( & Dogs )
Called Men At Work
It is available at Stargazers Scraps Here
Open a 600x600 new image.
Open your tube & scrap supplies.
Choose a gate/barricade element.
Paste as a new layer.
Using your magic wand tool
& while holding shift button down,
select inside the element.
Selections modify expand by 6
Paste a paper of choice as a new layer.
Selections invert & press delete.
Select none.
Move the paper layer under the
element layer.
Paste your tube as the new top layer.
Position in front bottom part of the element.
Add a drop shadow to the tube
2,2,50,5 Black.
Open a road sign.
Resize 60%
Paste behind your main tube.
Arrange in center of the barricade element.
Apply the EyeCandy4000 to the road
sign element.
Gradient Glow
Fat setting glow width 3
Open tools element.
Resize 40%
Paste by your main tube.
Add a drop shadow.
Open a safety vest element.
Resize 70%
Paste on the bottom layer of the tag.
Position in the center.
Add text to bottom part of the tag.
Enlarge & position as wanted.
Merge layers visible.
Resize 88%
Add copyright info & name.
Save as png format.
Thanks for trying my tutorial.

No comments:
Post a Comment