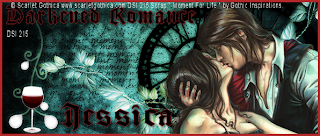
Darkened Romance
This tutorial was written
by Sarah Fiack on
May 6, 2011
Any resemblance to another
tutorial is purely coincidental.
For this tutorial, I’m using
a tube by Scarlet Gothica
You can purchase this tube at
DreamscapeImaging
Supplies:
Tube of choice
Scrap of choice.
I’m using one by Gothic Inspiratiosn
Called Moment For Life
Here
Plugin Xero Radiance
Open a 600x250 new image.
Open your tube & scrap supplies.
Paste a paper as a new layer
onto your new image.
Select your magic wand tool.
Click on the bottom layer with your
magic wand to select it.
Paste your main tube as a new layer.
Position as wanted.
Selections invert & press delete.
Select none.
Open a clockface element.
Resize 43%
Paste twice behind your main tube.
You want to alternate the two layers
slightly.
Merge the two clock layers together.
Duplicate once & mirror.
Lower the opacity on the mirrored layer
to about 25%
Add a drop shadow to the tube layer.
2,2,50,5 Black
Open a hanging flower vine.
Resize 50%
Paste on opposite side of the
tag as the tube.
Add a drop shadow.
Open a wine glass element.
Resize 10%
Paste in front of the bottom of the
vine flower.
Open a wordart background.
Resize 45%
Paste once on the tag along the
paper layer.
Open a leaf branch.
Resize 50%
Mirror once.
Paste as a new layer & position in the
layer palette to be below your main tube.
Duplicate the leaf branch once.
Rotate free rotate Right 90
Position if needed behind your tube.
Okay if your main tube isnt the top
layer in your layer palette, move it so
that it is.
Hide your main tube for the moment.
You can do this by clicking on the eye icon.
Merge visible the rest of the layers.
Unhide your tube layer.
On the merged layers,
Now apply Xero Radiance Plugin
Strangeness 79
Charm 50
Truth 128
Beauty 255
Add wordart or saying of choice
to the tag.
Convert to raster if needed.
Add a drop shadow to the words.
Merge layers viisble.
Add a border size width 4
Color from tag.
Resize 98%
Add copyright info & name.
Save as png or jpeg.
Thanks for trying my tutorial.

Just gorgeous! Thank you sooooooooooooooo very much hun. xox Jess
ReplyDelete