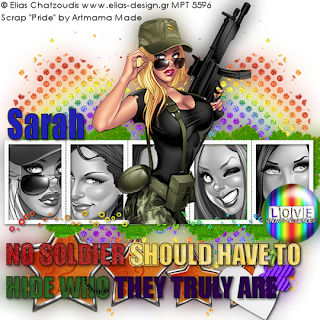
Love Knows No Gender
This tutorial was written
by Sarah Fiack on
September 30, 2010
Any resemblance to another
tutorial is purely coincidental.
For this tutorial, I’m using
The art of Elias Chatzoudis
You can purchase his artwork at
MPT
Supplies:
Tube & closeups of choice.
Scrap of choice.
I’m using one by Artmama
Called Pride
It is a PTU kit Here
Open a 600x600 new image.
Open up tube, tube closeups &
scrap supplies.
Open a multi square frame.
Resize 85% or as needed.
Paste as new layer.
Select the first square of the frame.
Selections modify expand 2
Resize close up 80%.
Paste a closeup of choice.
Selections invert & press delete.
Select none.
Repeat with the rest of the closeups
& the squares on the frame.
once you're done,
merge all the closeup layers together
Drop shadow the frame
2,2,50,5 black
On the close up layer, go to
adjust, hue & saturation
set both to 0
This will greyscale the layer.
Merge together with frame.
Open a rainbow doodle background.
Paste as new bottom layer
Move to side slightly
Duplicate once & mirror
Paste your main tube
Arrange on the frame.
Add a drop shadow to it.
Open rainbow circles ribbon.
Resize 80%
paste along the bottom of the frame.
Add a drop shadow.
Open a heart flower necklace.
Resize 85%
paste as if hanging from the frame.
Add a drop shadow.
Open a button.
Resize 80%
Paste at the necklace end.
Add a drop shadow.
Open a leaf clover.
paste as new layer.
Position under the frame.
Duplicate 4 times.
Move along the frame.
Now to do the words, select a font.
I used font.
Foreground black stroke set to 1
Fill is null.
Type out words of choice.
Expand as wanted.
Convert to raster.
Take your magic wand &
select inside the letters.
Selections modify expand by 1
Paste paper of choice.
Selections invert & press delete.
Select none.
Move paper under letter outline.
Repeat as wanted with letters & papers.
Merge the letter colors together.
Add a drop shadow to the letter outlines.
Open a star element.
Paste behind the wordart in one spot.
This helps "pop" the wordart some more.
Duplicate the star once.
resize the copy star 75%
Move to side of the larger star.
Repeat this two more times.
Each time duplicate from the previous
star which you resized.
You want the stars to descend in size.
Merge layers visible.
Duplicate once
On the bottom merged layer.
Adjust blur gauassian 18
Resize all layers 88% or 90%.
Add copyright info & name.
thanks for trying my tutorial.

No comments:
Post a Comment