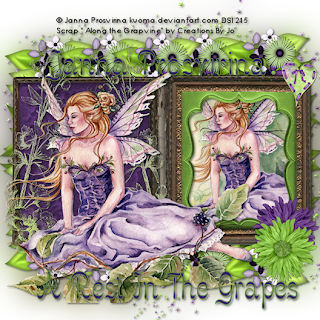
Rest In The Grapes
This tutorial was written
by Sarah Fiack on
May 21, 2010
Any resemblance to another
tutorial is purely coincidental.
For this tutorial, I’m using
The art of Janna Provirina
http://kuoma.deviantart.com
You can purchase her artwork at
Dreamscape
Supplies:
Tube & Image of choice
Scrap of choice
I’m using Along the grapevine by
Creations By Jo.
It’s a PTU kit.
Scrap
1) Open a 600x600 new image.
Open tube & kit as well.
2) Choose a frame of choice from kit.
Resize 81%.
Paste as new layer onto new image.
Add a drop shadow
2,2,50,5 black
3) Select inside frame with magic wand.
Selections modify expand 15
Paste image of choice as new layer.
Selections invert & press delete.
Select none.
Move image under frame.
4) Choose a flower ribbon.
Resize 50% once & 60% once.
Paste as new layer behind the frame & image.
Duplicate 4-5 times.
Arrange beside the original.
Merge the flower ribbons together.
Add drop shadow.
Duplicate & flip
5) Open a light color flower stem.
Resize 50%.
Paste as new layer on side of frame.
Duplicate once & mirror.
You want the two flowers on same side of frame
Just leaning in opposite directions.
Drop shadow both.
6) Take your tube & resize 88%.
Paste as top layer & add drop shadow.
7) Open the starcluster.
Resize 70%.
Paste as new layer on bottom.
Add a drop shadow.
8) Open heart element.
Resize 50% three times.
Paste as new layer on top corner.
Add a drop shadow.
9) Open two different color flowers.
Resize 25%.
Paste as new layers on bottom corner.
Slightly offset one on top of the other.
Add a drop shadow to them.
10) Merge layers visible.
Duplicate once.
On the bottom layer
Adjust blur Gauassian 25
You can add a wordart or saying if you wish.
11) Resize all layers 88%.
Add copyright info & name.
Save as jpeg or png.
Thanks for trying my tutorial.

No comments:
Post a Comment